This DIY is for Replacing the Coolant Flange that is on the drivers side of the Cylinder Head.
DISCLAIMER: The author(s) assume that you (the reader) are reasonably capable with the automotive tools necessary to get the job accomplished, which means that you won’t glue your fingers together or use a cutting torch to get the bad part out and are smart enough to know not to try to blame or post ranting about anyone else if something goes horribly wrong ... AGREED?
These instructions were developed using the following NB...
1) 2000 APH 1.8 liter Turbo, 5 speed, O2J Transmission
As always, just remember to offer a simple thank you and credit to the original author (D2Beetle) when you tell all of your BUG buddies!!
TIME NEEDED: 1 Hour.
ITEMS NEEDED: An eBahn Bentley DVD or Haynes manual.
PROJECT COST: $12-$15 for the Coolant Flange and $1 for the O-Ring, plus tax. In some instances the o-ring comes with the coolant flange. You should also replace the O-Ring for the Coolant Sensor; $1 plus tax.
SPECIAL TOOLS: None.
WARNINGS: Do not perform this maintenance if you have driven your NB within the past hour; wait until the engine has cooled, which take 1-2 hours.
CAUTIONS: Be careful with all plastic, it will be brittle. If something does not move look for the screw(s) that you missed? There will be lots of screws so do not loose any, I put mine in Ziploc bag(s) labeled as to where they go.
So let’s begin ...
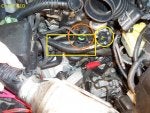
The yellow arrow in pic [CF DIY 001] shows you where the Coolant Flange is located. It is below the SAP Air hoses and Intake Breather Tube [CF DIY 004]; however the Coolant Flange cannot be seen in the pic.
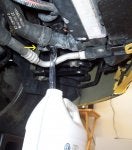
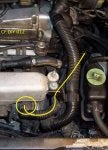
Step Zero: You will need to drain the coolant. If you can save And recycle your coolant; all you need are two regular gallon jugs or in my case I have two G12 jugs that I got from the dealer. I always try to recycle my coolant, as it gets a little costly. The arrow in the pic points to the drain knob; which is located at the drivers side bottom of the radiator.
Step One: Remove the engine cover [CF DIY 001], if you have one. Bolt #1 need not be removed, just loosen it. Remove the Caps covering bolts #2 ND #3, if you have them. There is a straight edge [CF DIY 002] on either side of the cap; insert a flat screw driver and pop the cap off [CF DIY 003] by prying up on the cap. After removing the engine cover you can see the coolant flange and temp sensor [CF DIY 004].
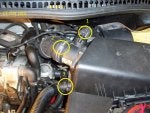
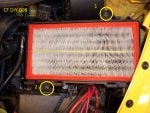
Step Two: Remove the Air Breather (aka Snow Box or Air Box) [CF DIY 005]; Disconnect the MAF, Intake Manifold Tube and SAP Intake Tube. Then remove the two screws for the air breather cover and remove the cover. Remove the two bolts for the lower section of the air breather [CF DIY 008] and remove the air breather. You can see the Coolant Flange now [CF DIY 010].
Step Three: Remove the Temp Sensor and disconnect the SAP Exhaust Tube. To remove the Temp sensor, simply pull the plastic tab (small yellow arrow) out of the coolant flange. There is no need to disconnect the coolant sensor wiring harness unless you want to. Just be sure that you do not damage the sensor end. removing the SAP Exhaust tube is tricky, because it will most likely be brittle mine was and it snapped off :banghead: right in the middle [CF DIY 011]. Pic [CF DIY 012] shows you where the SAP Exhaust Tube connects to the SAP.
DISCLAIMER: The author(s) assume that you (the reader) are reasonably capable with the automotive tools necessary to get the job accomplished, which means that you won’t glue your fingers together or use a cutting torch to get the bad part out and are smart enough to know not to try to blame or post ranting about anyone else if something goes horribly wrong ... AGREED?
These instructions were developed using the following NB...
1) 2000 APH 1.8 liter Turbo, 5 speed, O2J Transmission
As always, just remember to offer a simple thank you and credit to the original author (D2Beetle) when you tell all of your BUG buddies!!
TIME NEEDED: 1 Hour.
ITEMS NEEDED: An eBahn Bentley DVD or Haynes manual.
PROJECT COST: $12-$15 for the Coolant Flange and $1 for the O-Ring, plus tax. In some instances the o-ring comes with the coolant flange. You should also replace the O-Ring for the Coolant Sensor; $1 plus tax.
SPECIAL TOOLS: None.
WARNINGS: Do not perform this maintenance if you have driven your NB within the past hour; wait until the engine has cooled, which take 1-2 hours.
CAUTIONS: Be careful with all plastic, it will be brittle. If something does not move look for the screw(s) that you missed? There will be lots of screws so do not loose any, I put mine in Ziploc bag(s) labeled as to where they go.
So let’s begin ...
The yellow arrow in pic [CF DIY 001] shows you where the Coolant Flange is located. It is below the SAP Air hoses and Intake Breather Tube [CF DIY 004]; however the Coolant Flange cannot be seen in the pic.
Step Zero: You will need to drain the coolant. If you can save And recycle your coolant; all you need are two regular gallon jugs or in my case I have two G12 jugs that I got from the dealer. I always try to recycle my coolant, as it gets a little costly. The arrow in the pic points to the drain knob; which is located at the drivers side bottom of the radiator.
Step One: Remove the engine cover [CF DIY 001], if you have one. Bolt #1 need not be removed, just loosen it. Remove the Caps covering bolts #2 ND #3, if you have them. There is a straight edge [CF DIY 002] on either side of the cap; insert a flat screw driver and pop the cap off [CF DIY 003] by prying up on the cap. After removing the engine cover you can see the coolant flange and temp sensor [CF DIY 004].
Step Two: Remove the Air Breather (aka Snow Box or Air Box) [CF DIY 005]; Disconnect the MAF, Intake Manifold Tube and SAP Intake Tube. Then remove the two screws for the air breather cover and remove the cover. Remove the two bolts for the lower section of the air breather [CF DIY 008] and remove the air breather. You can see the Coolant Flange now [CF DIY 010].
Step Three: Remove the Temp Sensor and disconnect the SAP Exhaust Tube. To remove the Temp sensor, simply pull the plastic tab (small yellow arrow) out of the coolant flange. There is no need to disconnect the coolant sensor wiring harness unless you want to. Just be sure that you do not damage the sensor end. removing the SAP Exhaust tube is tricky, because it will most likely be brittle mine was and it snapped off :banghead: right in the middle [CF DIY 011]. Pic [CF DIY 012] shows you where the SAP Exhaust Tube connects to the SAP.