Removing the instrument cluster is only required if you have to remove the drive side dash, air bag or to repair the blend door.
DISCLAIMER: The author(s) assume that you (the reader) are reasonably capable with the automotive tools necessary to get the job accomplished, which means that you understand that a hack saw or cutting torch are not the right tools and are smart enough to know not to try to blame or post ranting about anyone else if something goes horribly wrong. AGREED?
These instructions were developed using the following NB - 1998 2.0 liter 5 speed
As always, just remember to offer a simple thank you and credit to the original author (D2Beetle) when you tell all of your NB friends!!
ITEMS NEEDED: An automotive manual; I have the eBahn Bentley DVD and the 1998/1999 Bentley Manual (C-1999).
PROJECT COST: $ 0.00 unless you break something.
SPECIAL TOOLS: None
TIME NEEDED: < 10 minutes.
SPECIAL REQUIREMENTS: Be sure that you have your Radio Code so that when you reconnect the battery you can get it out of "SAFE" mode.
CAUTIONS: It is necessary to disconnect the the battery for this project, so you do not short out the instrument cluster or accidentally set off the air bag. Be careful with all plastic, it will be brittle. If something does not move look for the screw(s) or clip(s) that you missed.
So let’s begin...
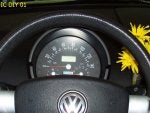
Step One: Remove the instrument cluster cover. Notice in pic [IC DIY 01] the odometer display is blank; if you have not disconnected the negative terminal battery, DO SO NOW!
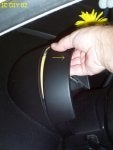
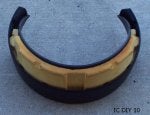
Pull gently on the top center of the instrument cluster cover; it will unsnap and you can remove it. Pic [IC DIY 10] shows you what the inside of the cover looks like; do not damage the foam insulation.
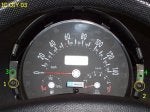
Step Two: Remove the instrument cluster. [IC DIY 03] The are two screws (T-10 bit noted in yellow) and two alignment tabs (noted in green); do not break off the alignment tabs! Remove the two screws, put your fingers on the sides where the two alignment tabs are and pull toward you.
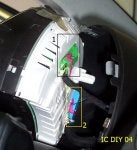
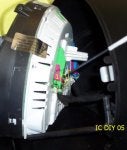
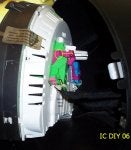
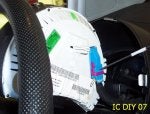
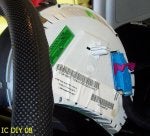
Step Three: Disconnect the wiring harness from the instrument cluster. [IC DIY 04] The wire on the left side (green connector #1) of my instrument cluster was longest so I disconnected it first. [IC DIY 05] Using a small flat head screw driver, push in/down on the small connector tab while flipping up on the locking lever. It is a bit awkward but fairly easy to do. [IC DIY 06] Grip the connector (yellow circle) and pull out, careful these connectors have a snug fit; if you pull to hard, when it releases you will bang your knuckles on the top portion of the instrument cover. [IC DIY 07 and 08] Repeat this step for the blue connector #2.
That is it, you are done!
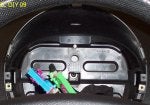
Pic [IC DIY 09] shows you the instrument console empty.
DISCLAIMER: The author(s) assume that you (the reader) are reasonably capable with the automotive tools necessary to get the job accomplished, which means that you understand that a hack saw or cutting torch are not the right tools and are smart enough to know not to try to blame or post ranting about anyone else if something goes horribly wrong. AGREED?
These instructions were developed using the following NB - 1998 2.0 liter 5 speed
As always, just remember to offer a simple thank you and credit to the original author (D2Beetle) when you tell all of your NB friends!!
ITEMS NEEDED: An automotive manual; I have the eBahn Bentley DVD and the 1998/1999 Bentley Manual (C-1999).
PROJECT COST: $ 0.00 unless you break something.
SPECIAL TOOLS: None
TIME NEEDED: < 10 minutes.
SPECIAL REQUIREMENTS: Be sure that you have your Radio Code so that when you reconnect the battery you can get it out of "SAFE" mode.
CAUTIONS: It is necessary to disconnect the the battery for this project, so you do not short out the instrument cluster or accidentally set off the air bag. Be careful with all plastic, it will be brittle. If something does not move look for the screw(s) or clip(s) that you missed.
So let’s begin...
Step One: Remove the instrument cluster cover. Notice in pic [IC DIY 01] the odometer display is blank; if you have not disconnected the negative terminal battery, DO SO NOW!
Pull gently on the top center of the instrument cluster cover; it will unsnap and you can remove it. Pic [IC DIY 10] shows you what the inside of the cover looks like; do not damage the foam insulation.
Step Two: Remove the instrument cluster. [IC DIY 03] The are two screws (T-10 bit noted in yellow) and two alignment tabs (noted in green); do not break off the alignment tabs! Remove the two screws, put your fingers on the sides where the two alignment tabs are and pull toward you.
Step Three: Disconnect the wiring harness from the instrument cluster. [IC DIY 04] The wire on the left side (green connector #1) of my instrument cluster was longest so I disconnected it first. [IC DIY 05] Using a small flat head screw driver, push in/down on the small connector tab while flipping up on the locking lever. It is a bit awkward but fairly easy to do. [IC DIY 06] Grip the connector (yellow circle) and pull out, careful these connectors have a snug fit; if you pull to hard, when it releases you will bang your knuckles on the top portion of the instrument cover. [IC DIY 07 and 08] Repeat this step for the blue connector #2.
That is it, you are done!
Pic [IC DIY 09] shows you the instrument console empty.