Hi everyone I wanted to share with you some photos of my project car.
I'm planning to upgrade my engine to 450HP, I already start buying parts for the engine, but before that, I did some upgrades on the car.
This can be a nice album of the project.
Cheers!!!!
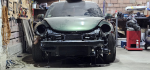
This is the car that I start with") is not the greatest condition,but is good for the start.
is not the greatest condition,but is good for the start.


Than I started changing the seats...

Cleaning the engine bay.:


I bought new rims for winter tires...In the same time I polished car part by part...


More pics in the next post
I'm planning to upgrade my engine to 450HP, I already start buying parts for the engine, but before that, I did some upgrades on the car.
This can be a nice album of the project.
Cheers!!!!
This is the car that I start with
is not the greatest condition,but is good for the start.Than I started changing the seats...
Cleaning the engine bay.:
I bought new rims for winter tires...In the same time I polished car part by part...
More pics in the next post