Well the headliner in my '98 started sagging so I improvised [VHL DIY 000] and all was well, until spring came; I prefer to have the windows down rather than A/C running, unfortunately the excess wind caused the headliner to separate at the window trim. So I picked up some spray adhesive and it only worked for a day; the wind was causing the remaining headliner to flap which worked loose the headliner edges that I glued.
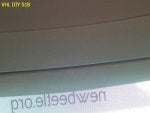
So I realized that I could not put it off any longer, time to due a headliner replacement and put together another DIY. Now I wanted a similar padded feel just like the original, but wanted to be sure not to get a fabric that cannot be cleaned with upholster cleaner; nearly all fabric I looked at was dry clean only. I did manage to find a plush/padded fabric in my color [VHL DIY 039] (it is actually Yellow, [VHL DIY 039] pic does not do it justice) and was hand wash only, delicate cycle, lay flat to dry. So this meant that I could put it in the washing machine on the delicate cycle and lay it across the roof of my NB to dry. It also has a mesh backing [VHL DIY 040]; which meant that once glued it should hold up really well, Cool!
DISCLAIMER: The author(s) assume that you (the reader) are reasonably capable with the automotive tools necessary to get the job accomplished, which means that you understand that a hack saw or cutting torch are not the right tools and are smart enough to know not to try to blame or post ranting about anyone else if something goes horribly wrong. AGREED?
These instructions were developed using the following NB - 1998 2.0 liter 5 speed
According to eBahn-Bentley the interior layout changed after January 1999, with following interior additions and there are no removal instructions for these items unless noted otherwise...
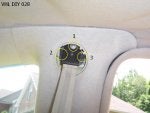
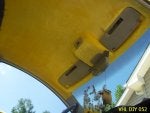
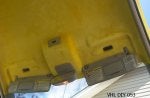
1) Sunroof
As always, just remember to offer a simple thank you and credit to the original author (D2Beetle) when you tell all of your NB friends!!
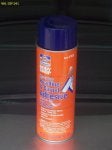
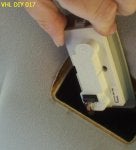
ITEMS NEEDED: An automotive manual; I have the eBahn Bentley DVD and the 1998/1999 Bentley Manual (C-1999). You will need replacement fabric (1.5 sq yards) of your choice or you can wash (delicate cycle cold/cold, lay flat to dry) the existing headliner fabric and reuse it. The existing headliner fabric is like window shears, hold it up in front of you and you can see through it, so you will need some sort of backing (i.e. foam) material if you choose to reuse it and let's not forget the upholstery/fabric/headliner adhesive [VHL DIY 041] of your choice.
FABRIC REQUIREMENTS: Be sure that the fabric you choose has some ability to stretch; FYI, 100% cotton and canvas type fabrics do not stretch well and causes wrinkles in tight corners, so pleating is required. Now fabric weight is something that must be considered, as gravity can surprise you. The fabric that I choose for this DIY can be found here. For those who are curious about Fabric Industry Standards, here is there formula for determining fabric weight ...
1) Measure the yardage of the fabric. One yard equals 0.9144 meters, therefore one yard squared equals 0.9144 meters times 0.9144 meters, and equals 0.83612736 meters squared. Fabric weight calculations are generally measured grams per square meter.
2) Use grams as your main calculation for weight, when weighing fabric. The total of 28.3495231 grams by 0.83612736 meters squared will equal 33.90574744 grams per meter squared. This is the most common equation used in the fabric industry.
3) Round up to three decimal places from 33.90574744 to get 33.906 grams per meter squared.
Read more: How to Calculate the Weight of Fabric | eHow http://www.ehow.com/how_7449129_calculate-weight-fabric.html#ixzz2UDUpjCF8
Yea, I can calculate that, maybe not ... math is not my forte, here is what I did, so bare with me, as it is all after the fact ...
1) Weight of stock (no foam) headliner fabric, 120 grams or 4.23 ounces
2) Weight of 6 square inches (.046296 square yard) of my selected fabric weighs 15 grams
3) There are 21.6, six inch squares in one square yard and 10.8 in a half square yard
4) That is 32.4, six inch squares, which weigh 15 grams each
5) Total fabric weight is 486 Grams or 17.41 ounces or 1.07 pounds
6) 15% Fabric weight variance for foam, if you choose to use it, that is +73 grams or 2.57 ounces
So as long as your headliner weight (Fabric and Foam) is less than 1.5 pounds, you are good to go.
PROJECT COST: (moderate estimate): 1 Cloth/Fabric (1.5 sq yards) $20.00, 1-16 oz Spray Can Adhesive $11.00.
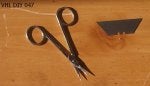
SPECIAL TOOLS: None needed.
TIME NEEDED: 30 minutes for headliner removal and re-installation, +/- for 30 minutes for your DIY skills. Also the adhesive that you choose to use will have a cure time (read the directions on the can), be sure that you factor that in so your headliner does not drop on your head when you are re-installing it. Trimming the fabric can vary from 15 minutes to an hour depending on how easy the fabric is to cut and the neatness that you want on the edges.
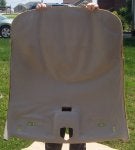
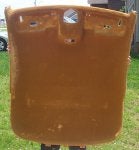
SPECIAL REQUIREMENTS: The existing foam on the headliner will have to be removed and if choose to reuse the existing headliner fabric it will have to be removed as well and washing it usually does it. When removing the foam do it carefully as the headliner is a VERY THIN FIBERGLASS SHELL and IT WILL CRACK and/or BREAK EASILY if not handled properly! Also if you do choose to use foam, you will need to sand (180-320 Grit sanding sponge works well) the surface to eliminated anything that will cause the foam to snag and it is oh so easy to snag foam.
CAUTIONS: It is not necessary to disconnect the the battery for this project; however if this is a step in a larger project you might want to. Be careful with all plastic, it will be brittle. If something does not move look for the screw(s) or clip(s) that you missed?
So let’s begin...
So I realized that I could not put it off any longer, time to due a headliner replacement and put together another DIY. Now I wanted a similar padded feel just like the original, but wanted to be sure not to get a fabric that cannot be cleaned with upholster cleaner; nearly all fabric I looked at was dry clean only. I did manage to find a plush/padded fabric in my color [VHL DIY 039] (it is actually Yellow, [VHL DIY 039] pic does not do it justice) and was hand wash only, delicate cycle, lay flat to dry. So this meant that I could put it in the washing machine on the delicate cycle and lay it across the roof of my NB to dry. It also has a mesh backing [VHL DIY 040]; which meant that once glued it should hold up really well, Cool!
DISCLAIMER: The author(s) assume that you (the reader) are reasonably capable with the automotive tools necessary to get the job accomplished, which means that you understand that a hack saw or cutting torch are not the right tools and are smart enough to know not to try to blame or post ranting about anyone else if something goes horribly wrong. AGREED?
These instructions were developed using the following NB - 1998 2.0 liter 5 speed
According to eBahn-Bentley the interior layout changed after January 1999, with following interior additions and there are no removal instructions for these items unless noted otherwise...
1) Sunroof
As always, just remember to offer a simple thank you and credit to the original author (D2Beetle) when you tell all of your NB friends!!
ITEMS NEEDED: An automotive manual; I have the eBahn Bentley DVD and the 1998/1999 Bentley Manual (C-1999). You will need replacement fabric (1.5 sq yards) of your choice or you can wash (delicate cycle cold/cold, lay flat to dry) the existing headliner fabric and reuse it. The existing headliner fabric is like window shears, hold it up in front of you and you can see through it, so you will need some sort of backing (i.e. foam) material if you choose to reuse it and let's not forget the upholstery/fabric/headliner adhesive [VHL DIY 041] of your choice.
FABRIC REQUIREMENTS: Be sure that the fabric you choose has some ability to stretch; FYI, 100% cotton and canvas type fabrics do not stretch well and causes wrinkles in tight corners, so pleating is required. Now fabric weight is something that must be considered, as gravity can surprise you. The fabric that I choose for this DIY can be found here. For those who are curious about Fabric Industry Standards, here is there formula for determining fabric weight ...
1) Measure the yardage of the fabric. One yard equals 0.9144 meters, therefore one yard squared equals 0.9144 meters times 0.9144 meters, and equals 0.83612736 meters squared. Fabric weight calculations are generally measured grams per square meter.
2) Use grams as your main calculation for weight, when weighing fabric. The total of 28.3495231 grams by 0.83612736 meters squared will equal 33.90574744 grams per meter squared. This is the most common equation used in the fabric industry.
3) Round up to three decimal places from 33.90574744 to get 33.906 grams per meter squared.
Read more: How to Calculate the Weight of Fabric | eHow http://www.ehow.com/how_7449129_calculate-weight-fabric.html#ixzz2UDUpjCF8
Yea, I can calculate that,
maybe not ... math is not my forte, here is what I did, so bare with me, as it is all after the fact ...1) Weight of stock (no foam) headliner fabric, 120 grams or 4.23 ounces
2) Weight of 6 square inches (.046296 square yard) of my selected fabric weighs 15 grams
3) There are 21.6, six inch squares in one square yard and 10.8 in a half square yard
4) That is 32.4, six inch squares, which weigh 15 grams each
5) Total fabric weight is 486 Grams or 17.41 ounces or 1.07 pounds
6) 15% Fabric weight variance for foam, if you choose to use it, that is +73 grams or 2.57 ounces
So as long as your headliner weight (Fabric and Foam) is less than 1.5 pounds, you are good to go.
PROJECT COST: (moderate estimate): 1 Cloth/Fabric (1.5 sq yards) $20.00, 1-16 oz Spray Can Adhesive $11.00.
SPECIAL TOOLS: None needed.
TIME NEEDED: 30 minutes for headliner removal and re-installation, +/- for 30 minutes for your DIY skills. Also the adhesive that you choose to use will have a cure time (read the directions on the can), be sure that you factor that in so your headliner does not drop on your head when you are re-installing it. Trimming the fabric can vary from 15 minutes to an hour depending on how easy the fabric is to cut and the neatness that you want on the edges.
SPECIAL REQUIREMENTS: The existing foam on the headliner will have to be removed and if choose to reuse the existing headliner fabric it will have to be removed as well and washing it usually does it. When removing the foam do it carefully as the headliner is a VERY THIN FIBERGLASS SHELL and IT WILL CRACK and/or BREAK EASILY if not handled properly! Also if you do choose to use foam, you will need to sand (180-320 Grit sanding sponge works well) the surface to eliminated anything that will cause the foam to snag and it is oh so easy to snag foam.
CAUTIONS: It is not necessary to disconnect the the battery for this project; however if this is a step in a larger project you might want to. Be careful with all plastic, it will be brittle. If something does not move look for the screw(s) or clip(s) that you missed?
So let’s begin...